03. Deployment Configuration
Introduction to Heroku Deployment
Introduction to Heroku Deployment
In the last course, you learned how to deploy applications to AWS EKS. Because Heroku is so easy to use, we'll be able to get you up and running with Heroku a bit faster. Though Heroku is easy to use, it will require us to make some updates to how we structure our application so Heroku can build and run the application properly.
In this section, we'll discuss how to build and configure your application such that it runs properly on Heroku. Here's a sneak peek of what that entails:
-
Creating and updating a
requirements.txtfile to install dependencies - Setting up your environment variables
-
Using a
Procfile, using gunicorn to run the application
We'll also discuss creating and managing your database in the next concept.
Installing Dependencies
Installing Dependencies
Deploying an application to Heroku is as simple as pushing that repository to Heroku, just like Github. Heroku does a lot of things behind the scenes for us when we push a repository - including installing dependencies. For a Python application, Heroku looks for a
requirements.txt
file that needs to include all of your dependencies.
If you want to follow along
using the sample project, fork and clone it from this
link
before continuing. The sample project is live at
https://sample-cem.herokuapp.com/
. Try endpoints
/
and
/coolkids
.
In order to save our package requirements we'll use the following command:
pip freeze > requirements.txtPip freezing is a process in which pip reads versions of all packages in the current virtual environment and saves them to a text file. In our case, this the text file that Heroku will use to install dependencies.
Be advised: the requirements.txt file does not automatically update if you install a new library. It's like a snapshot - any changes after aren't reflected in a past snapshot. You'll want to ensure
requirements.txt
is up to date before pushing your app to Heroku.
If you want to learn more about pip, check out this segment of Websauna documentation .
Environment Configuration
Environment Configuration
In previous projects, you used a bash file to set up local environment variables. You'll do the same here. We want them all contained in the same kind of file for easier transfer later to the Heroku interface.
If you're following along in the project, use
touch setup.sh
and set up all of your environment variables in that file.
Most of the work we do for Heroku will be in our application files or the command line. In order to give you some familiarity with the web interface, we'll set up the environment variables there, after we deploy our application. For now, check out the screenshot below to get used to the interface. Once you're in a project's settings, you'll see an option to
Reveal Config Vars
. Once you click on that, a table similar to that you see below will appear. Here, you define your variables just as you did in the
setup.sh
file, just without the equals signs!
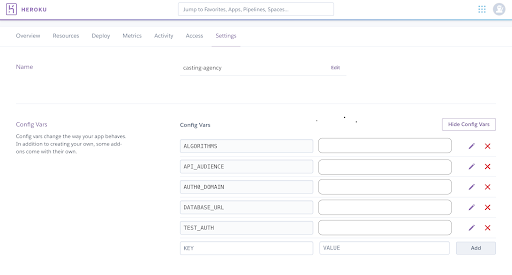
After hitting
Reveal Config Vars
you’ll see a table like this where you can define environment variables for your hosted Heroku app.
Gunicorn for Heroku
Gunicorn
Gunicorn is a pure-Python HTTP server for WSGI applications. We'll be deploying our applications using the Gunicorn webserver.
First, we need to install gunicorn using
pip install gunicorn
. Next
touch Procfile
to create the file.
Procfile is exceedingly simple. It only needs to include one line to instruct Heroku correctly for us:
web: gunicorn app:app
. Just make sure your app is housed in
app.py
as it is in the sample project. Go ahead and make those updates to the sample project if you're following along.
Process Check